AstroDMx Technical Help for Windows
This page details installation instructions and highlights specific information pertaining using AstroDMx Capture on Windows computers. If you are having problems then please read the information contained on this page.
The Windows build of AstroDMx Capture requires a 64-bit version of Windows 10 or 11. All cameras are supported but in order to use DSLR cameras you must change the default driver. More information about how to do this can be found on this page. AstroDMx is not fully supported on Windows 7 or 8.
Feel free to contact the software developer for further help if needed. Please ensure that you are using the latest version of AstroDMx Capture before reporting a potential problem.
The latest version can be downloaded from the downloads section of this website.
Disclaimer
Any procedures suggested on this website should be used carefully and will be at the users risk. Performing these procedures implies acceptance that the responsibility is with the user and the author of this website will not be held responsible for any problems arising from the use of these procedures.
The information and procedures on this page are specific to Windows computers.
Installing AstroDMx Capture
Installing AstroDMx Capture is straightforward on Windows, however, due to the fact that the developer does not sign the installers, you will need to grant permission for the application to run. The procedure for doing so is detailed below.
Install Procedure
Download the latest version of AstroDMx Capture from the download section of this website. After clicking download, your web browser may attempt to block the download but it’s easy to remove the block. This block occurs because the developer has not paid to have the installers signed. AstroDMx Capture is a free application and signing installers is expensive. It is, however, easy to remove any blocks and use the application in the normal way.
If your browser blocks the download, simply click on the download tab and select “Keep”.
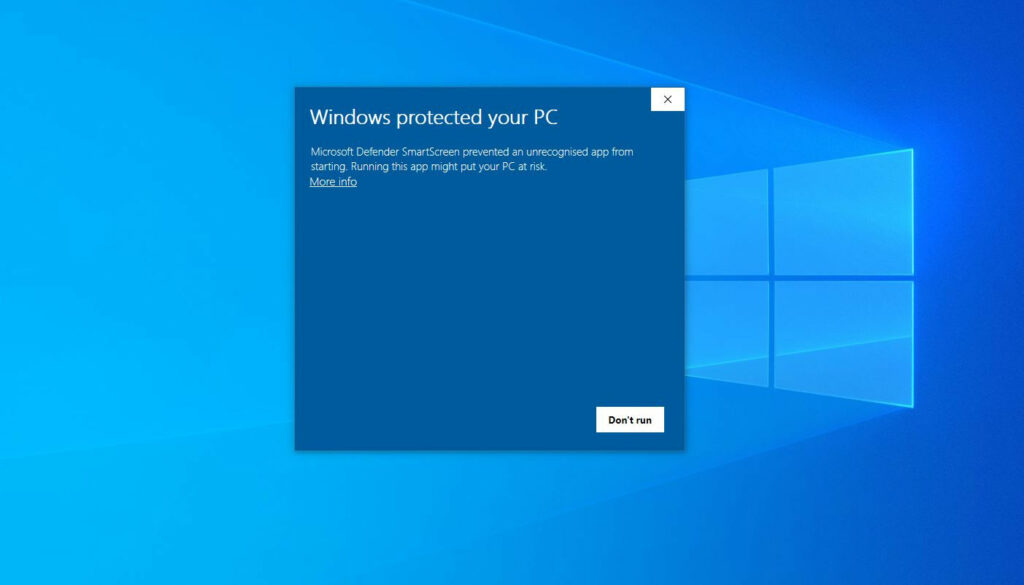
After downloading AstroDMx Capture, double-click on the installer file. Once you have done this, you will receive a notification from “Window SmartScreen”. The SmartScreen notification will look similar to the screenshot above. As already stated, this happens because the developer has not signed the installer but it is a simple matter to override the SmartScreen notification. In order to override this message, simply click on “More Info”.
After clicking “More Info”, you should see a screen similar to the screenshot below.
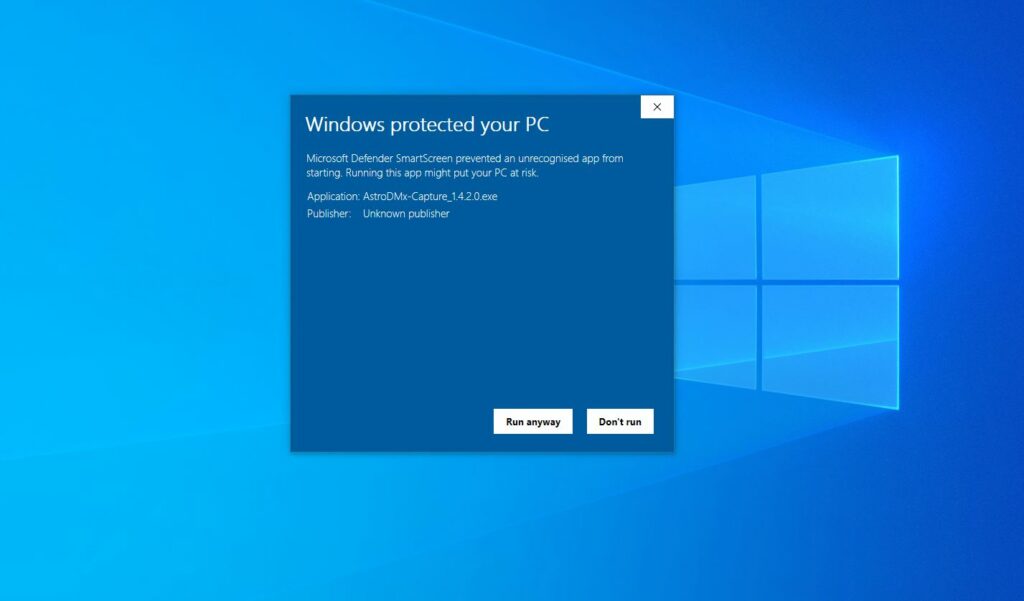
To finally install the application, you need to click on “Run anyway”. Once you have done this, AstroDMx Capture will install as normal. Once the procedure detailed above is complete, you will not need to repeat it until you install a new version of the application.
Feel free to contact the software developer if you have any problems with installing the application.
DSLR Cameras under Windows
AstroDMx Capture is able to directly control many Nikon and Canon DSLR cameras. If your DSLR camera supports tethering then the camera can be connected to AstroDMx Capture and controlled in the same way that other astronomy cameras are used.
In order to use DSLR cameras under Windows it is necessary to change the default driver that Windows automatically installs when you first connect your DSLR camera. There are various ways of doing this but the easiest for the end user is to use a third party program called Zadig. If you attempt to use a DSLR camera without changing the driver, you will receive an error message that warns you that the USB device could not be claimed.
Procedure to Change the Driver
NOTE: This procedure should only be run once. NOT each time you wish to use a DSLR with AstroDMx Capture. Follow the procedure at the bottom of this section if you wish to remove the new driver.
It is a simple matter to change the DSLR driver (and simple to reinstall the original, manufacturer supplied driver). In order to change the driver, you will need to download Zadig. Zadig is an open source tool specifically designed for this purpose. You can download Zadig from the download section of this website or directly from the software developer’s website located at https://zadig.akeo.ie. The tested and recommended version of Zadig for use with DSLR cameras is 2.7.
Once downloaded, double-click on the Zadig executable to run the program. Zadig will look like the following screenshot.
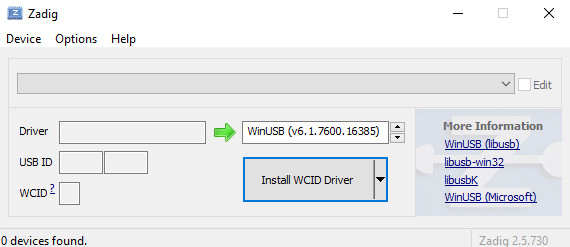
Connect your DSLR camera and then click on “Options” and select “List All Devices”. This causes your currently connected cameras to be shown in the drop down list. Now select your DSLR camera from the drop-down list, this will be shown as “Canon Digital Camera” or “Nikon Digital Camera”. The screenshot below shows a Canon DSLR selected and ready to have its driver changed.
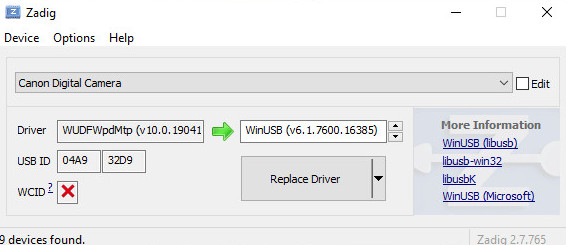
Make sure that the driver to the right of the green arrow is set to “WinUSB”. In all probability this will be default and so will not need to be changed. If the driver is different, then use the arrow keys to select “WinUSB”. Once Zadig looks similar to the screenshot above, click on “Replace Driver”. This should ONLY be done ONCE. It may take a few minutes for this change to be come active. Once complete, you will see the following.

You are now ready to use your DSLR camera in AstroDMx Capture and, as stated above, will not have to repeat this procedure again unless you intentionally change the driver back to the original default driver.
Revert to the Original Driver
- Connect your DSLR camera;
- Go to Device Manager;
- Locate and expand “Universal Serial Bus Drivers” and select your camera name. Once you have done this you can remove the driver in the usual way.
NOTE: If you have run the above procedure more than once, you will have to remove the WinUSB driver more than once. The exact number of times is equal to the number of times you had run the Zadig procedure.
Windows 7
AstroDMx Capture for Windows is NOT fully supported on Windows 7. It is possible that specialist Astronomy cameras may work but this is untested due to not having access to Windows 7. It is certain though that UVC cameras, for example, webcams and capture cards, will not work under Windows 7. The software developer does not recommend using the software under such an old operating system.
ZWO USB2 Cameras
When first released, ZWO USB2 cameras used a non-standard maxPacket size of 1024 bytes instead of following the correct standard and using 512 bytes. This should not be a problem if your computer has both EHCI and xHCI USB controllers. However, many new computers are no longer supplied with a EHCI USB controller and so, all USB packets, including USB2 are processed via the xHCI controller. Unfortunately, some xHCI USB controllers are unable to process an invalid maxPacket size of 1024.
If you are trying to use a USB2 ZWO camera under Windows and discover that there are problems with the driver state in Device Manager then you will have to change the default firmware. ZWO released a compatibility firmware which addresses this problem. It works by changing the maxPacket size back to the correct value of 512 bytes. The compatible firmware can be downloaded from the ZWO website. Under Windows, it is not necessary to change the firmware if the camera works correctly.
It’s worth noting that is is not an issue with AstroDMx Capture and, if the problem is present, it will be an issue for any capture application.
SVBONY SV205
The SV205 suffers from pixel vignetting so it is vital to use flat fields. Flat fields can be applied in real-time using AstroDMx Capture or applied during post-processing. For more information about using this camera, please see Dr S.J. Wainwright’s blog post.