AstroDMx Technical Help for macOS
This page details installation instructions and highlights specific information pertaining using AstroDMx Capture on Apple Mac computers. If you are having problems then please read the information contained on this page.
The macOS build of AstroDMx Capture supports all cameras and should work perfectly on any macOS version greater or equal to 10.14 (Mojave), older versions of macOS are supported but there could be some limitations. Specifically, the SV305 range of cameras are not supported on older versions of macOS and DSLR cameras can be problematic. It is therefore recommended that macOS 10.14 or higher is used if possible.
Feel free to contact the software developer for further help if needed. Please ensure that you are using the latest version of AstroDMx Capture before reporting a potential problem.
The latest version can be downloaded from the downloads section of this website.
Disclaimer
Any procedures suggested on this website should be used carefully and will be at the users risk. Performing these procedures implies acceptance that the responsibility is with the user and the author of this website will not be held responsible for any problems arising from the use of these procedures.
The information and procedures on this page are specific to Apple Mac computers.
Installing AstroDMx Capture
Installing AstroDMx Capture is straightforward on macOS, however, due to the fact that the developer does not sign the installers, you will need to grant permission for the application to run. The procedure for doing so is detailed below.
New Procedure – 2024/03/17
- Double click on the downloaded AstroDMx Capture DMG file
- Drag AstroDMx Capture.app into /Applications
- Launch a terminal and type the following:
- xattr -cr /Applications/AstroDMx\ Capture.app
- Press enter
Old Procedure – Not necessary if the above procedure works.
- Download the DMG file if using macOS High Sierra or above, otherwise download the ZIP file;
- Double Click on the DMG or ZIP file to extract its contents;
- Copy the app file into /Applications.
After installing AstroDMx Capture, run the application in the usual way. The application will not start and you will see a message similar to the following screenshot.
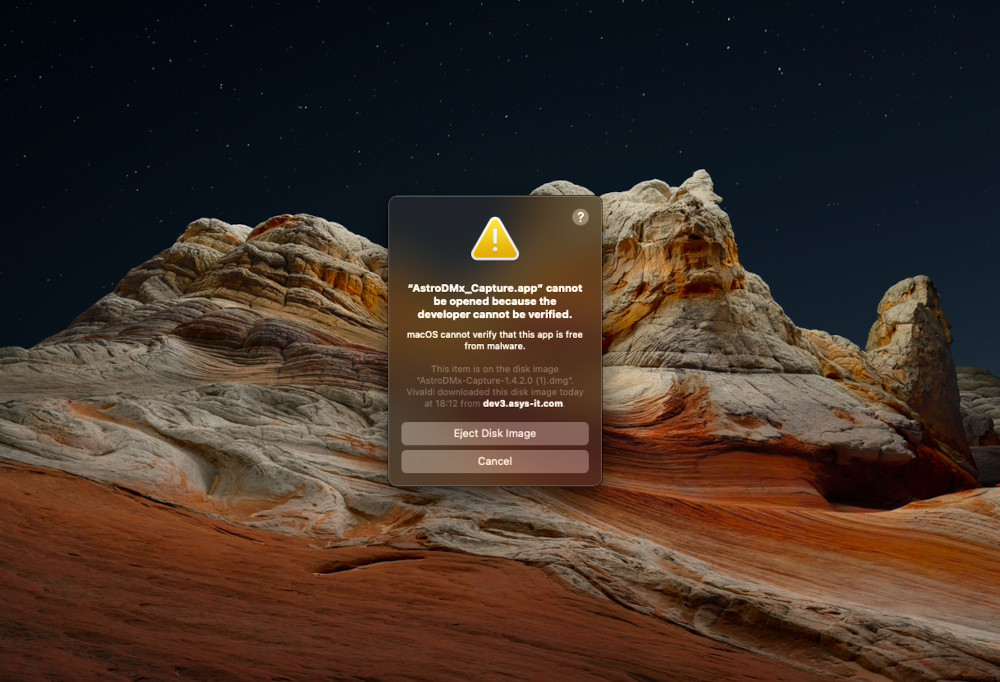
This message is coming from Apple Gatekeeper and is simply informing you that the application needs additional approval to run. This happens because the developer of AstroDMx Capture has not paid Apple to sign the application. The fee to sign applications is very high and, as AstroDMx Capture is a free application, it is not worth the considerable yearly expense to do so. It is, however, very simply to override this and the following few simple steps detail how to override Gatekeeper.
Steps to Override Gatekeeper
Simply click “Cancel” on the message and then go into “System Settings” and then click on “Security and Privacy”. Doing so will open your Mac’s security settings and will allow you to override Gatekeeper and run AstroDMx Capture.
After clicking “Cancel” and invoking Security & Privacy, you should see a screen that looks similar to the following screenshot.
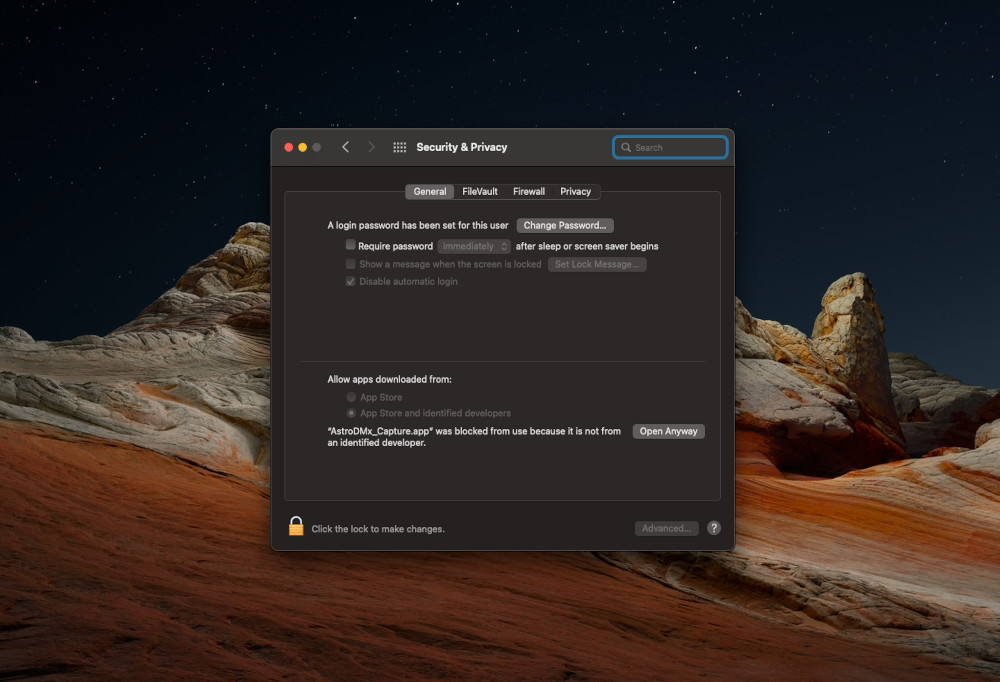
Make sure that you have clicked the “General” tab. At the bottom of this dialog you will see “Allow apps downloaded from” and below that, you should see “AstroDMx_Capture.app”. To the right of “AstroDMx_Capture.app” you should see a button called “Open Anyway”. Simply click this button to grant the application permission to run on your Mac.
After clicking “Open Anyway” you will receive one final message which will look like the following screenshot.
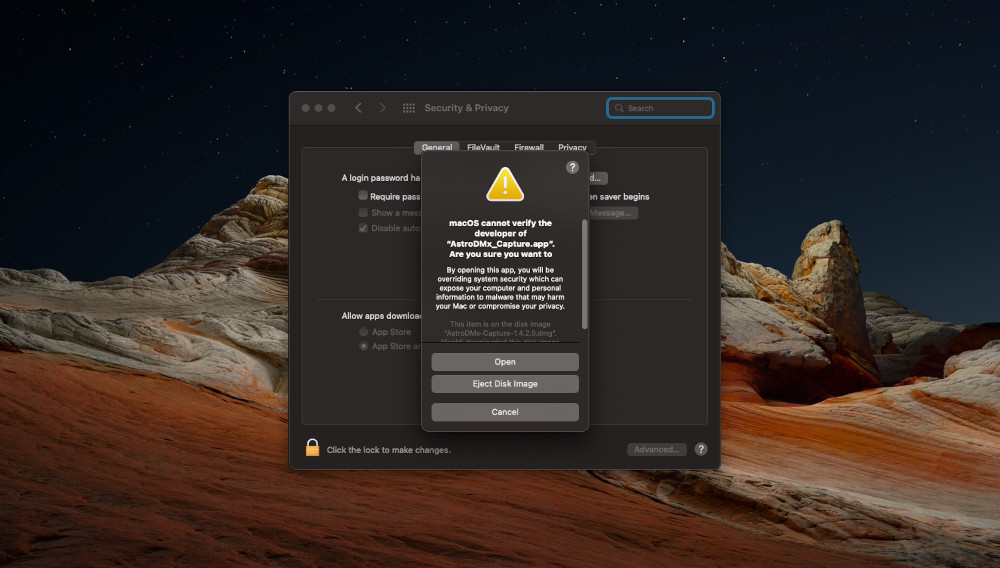
The final stage is to simply click on the “Open” button, after you have done this the application should open normally and you will not need to do this again until you install a new version of the application. Unfortunately, you will have to repeat this procedure each time you upgrade AstroDMx Capture. If you have any problems with the above, then please feel free to contact the developer.
Apple Silicon Installation
After downloading, the Apple Silicon build of AstroDMx Capture will report that the app bundle is corrupt. It is not corrupt but is being incorrectly reported so by Apple. This appears to be caused by AstroDMx not being notarised by Apple.
Unfortunately, Apple Notarisation requires a significant yearly financial payment to Apple and, as AstroDMx Capture is made available free of charge, this cost cannot be justified.
Fortunately, there is a simple solution to this problem. The procedure is as follows:
- Double click on the downloaded AstroDMx Capture DMG file
- Drag AstroDMx Capture.app into /Applications
- Launch a terminal and type the following:
- xattr -cr /Applications/AstroDMx\ Capture.app
- Press enter
Once the above procedure is complete, AstroDMx Capture should run correctly. The procedure will have to be repeated each time a new version is downloaded.
ZWO USB2 Cameras
When ZWO released its range of USB2 cameras (for example, ASI120MC), they were primarily designed to be used on Windows. By default, these cameras use a non-standard maxPacket size of 1024 bytes instead of 512 bytes, while this works on Windows computers with an EHCI USB controller, it can be a problem for other operating systems.
In order to fix this problem, ZWO released a compatibility firmware which changed the maxPacket size back to 512 bytes. However, the compatibility firmware appears to introduce other problems that may render ZWO USB2 cameras difficult to use on macOS.
If significant split frames are observed, the user should flash the camera with the compatibility firmware which can be downloaded from the ZWO website. It’s important to note that in order to flash the camera, the user will require a Windows computer. It is not recommended to flash any device from a Windows virtual machine as this could introduce problems that could damage the camera.
In order to reduce the number of split frames, if can beneficial to increase the USB bandwidth setting to maximum.
UVC Cameras (webcam etc)
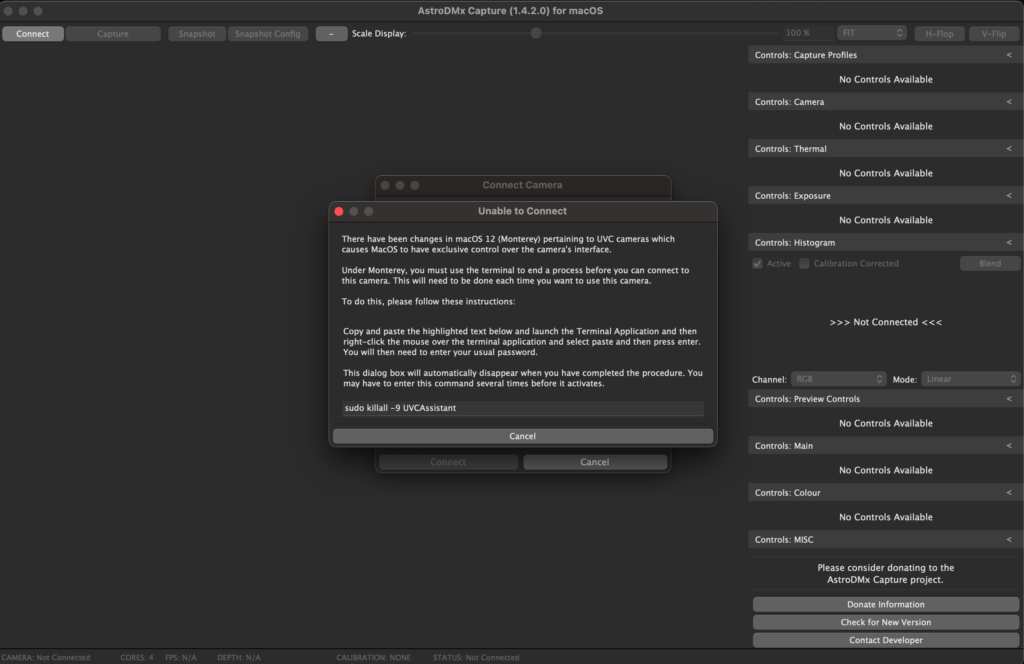
macOS 12 (Monterey) has a design change that causes an exclusive lock on webcams and other UVC cameras after connection which stops AstroDMx Capture from being able to use the interface. The latest version circumvents this problem but requires some user input. After connecting AstroDMx to a UVC camera, you will see a message explaining what must be done. The procedure is relatively straight forward but requires the use of the terminal. Full instructions are provided in the application but for clarification, the procedure is detailed below.
The Procedure
After connecting to a webcam or another UVC type device, for example, a capture card, you will see the following message.
Start a terminal session and copy the command from the dialog and then paste it into a terminal session and then press enter. This will cause the macOS UVC driver to be temporarily killed which will allow AstroDMx to gain control over your camera. This procedure will have to be repeated for each connection. This does not apply to any macOS version older than macOS Monterey.
Histogram Problems
Occasionally the histogram fails to render correctly, when this happens the histogram does not use the entire area or may flash repeatedly. This problem can be fixed by simply turning the histogram off and then back on. After doing this, the histogram should render correctly.
SVBONY SV205
The SV205 suffers from pixel vignetting so it is vital to use flat fields. Flat fields can be applied in real-time using AstroDMx Capture or applied during post-processing. For more information about using this camera, please see Dr S.J. Wainwright’s blog post.