AstroDMx Overview
Introduction
AstroDMx Capture is a cross-platform astronomical image capture application written from the ground up to be platform independent. It has been written by Nicola Amanda Mackin FRAS in C++ with performance and reliability as some of the most important factors. AstroDMx Capture is coded on Linux and then compiled to run on macOS, Raspberry Pi OS, Windows and ChromeOS.
The application is intended for both deep sky imaging and planetary type imaging. Due to the use of efficient algorithms it can obtain high frame-rates even on low specification hardware which makes it just as effective for planetary and lunar imaging as it is for deep sky work.
This article is not intended to provide instructions on how to use AstroDMx, the primary purpose of the page is to highlight the main features of the image capture application. If you just want to download AstroDMx Capture, then visit the download page.Controls
Page Navigation
- Introduction
- User Interface
- Connection Monitor
- Real-time Calibration
- Keyboard Controls
- Histogram
- Capture Controls
- Pixel Formats
- Debayer Settings
- Markers and Guides
- Motion Detection
- Display Controls
- Filter Wheels
- Supported Hardware
When viewing specific sections of this article you should notice an icon appear on the right hand side at of the browser window. This icon will return you to the top of the page.
User Interface
The look and feel of AstroDMx Capture is inherited from your desktop theme, this effectively means that all colours and control styles are dictated by the operating system and will cause AstroDMx to look like any native application on your operating system. If you are using Linux or macOS and you have a dark theme enabled, then AstroDMx will inherit this and will be rendered in a dark theme. Dark themes are arguably more relaxing and potentially better for dark adaption.
Unfortunately, due to limitations of Windows, AstroDMx will not be rendered in a dark theme regardless of the Windows dark mode being active.
Most of the controls are dynamic, and so only the controls relevant to the connected camera are visible. For convenience, the camera controls are organised into logical groups, all of which can be minimised to save space. If the computer monitor is not large enough and too many controls are maximised, then a scrollbar will appear which allows the user to see all available controls quickly and efficiently.

Camera Controls – Overview
Most camera controls within AstroDMx Capture are context aware and can be found on the right hand side. That is to say, only controls valid for the connected camera and its specific setup are shown. For example, if a 12-bit camera is connected in 8-bit mode, then 16-bit options will not show in the UI. The control values can operate in two different ways, the first and default is to use the manufactures units and the other is to use percentage units. This mode can be changed from the main drop-down menu.
The main control group can be resized by dragging the handle to the left of the controls. The control area defaults back to the original size after restarting but it is possible to have the application remember the previous control area size. This function can be found under the Options drop-down menu. Similarly, the application remembers the UI size on exit but it is possible to disable this function from the Options drop-down menu.
The software supports all the usual camera controls such as exposure, gain, gamma, brightness, offset and contrast etc. If supported by the camera the software also shows options for controlling the camera’s cooler (target temperature, cooler power, fan and dew heater controls), USB bandwidth, ROI, binning etc. The number of controls visible will be dependent upon your camera’s capabilities. Most camera controls can be reset to the camera’s default by right-clicking the control’s slider.
The software supports image flipping and flopping, scaling of the real-time display and shows a real-time frame rate. If a camera has a larger resolution than the preview display, then the display output is scaled to optimally fill the preview display on startup. If the area to be previewed is larger than the preview window, then the software will show scrollbars so that the entire preview can be seen.
Most controls have two aspects. The first is a simple slider which allows the user to change the control value simply by moving the slider to the left or the right. As the sliders are changed, the resulting value is displayed in a text box to the right of the slider and the value is applied to the camera in real-time.
The second is to allow the entry values more accurately. It is possible to type in directly the control’s value. This can be done by typing a number into the text box to the right of the control’s slider and then pressing enter. After pressing enter, AstroDMx will validate the information entered and let the user know if an invalid number has been entered. Once the information has been validated, it will be applied to the camera.
Entering values is of most use for exposures. Exposure values are entered as numbers followed by either ms for milliseconds, s for seconds and m for minutes. The slider must be used if working in microseconds. The following list shows four examples of how to enter exposure values.
- 150ms (exposes the camera at 150 milliseconds)
- 5s (exposes the camera at 5 seconds)
- 1m5s (exposes the camera at 1 minute and 5 seconds)
- 75s (exposes the camera at 1 minute and 15 seconds)
- 3000ms (exposes the camera at 3 seconds)
The Enter key must be pressed after entering a value. The software will automatically validate the values entered and warn the user if a value is out of range or otherwise invalid.
Specific Control Groups
On the right hand side of the application is the main camera control area. This area is divided into logical control groups consisting of the following groups and what is offered in each group will be dictated by the camera’s capabilities.
- Controls: Capture Profiles
This group of controls allows the user to store previous capture settings and easily retrieve these settings for future imaging sessions. Each profile is tied to a specific camera and so the application will not allow a profile made for one camera camera to be applied to another camera. The control group allows for the creation of new profiles, to rename old profiles or to delete profiles that are no longer required.
- Controls: Camera
This group of controls allows the user to setup the connected camera in the mode required. The main controls in this group include changing the camera’s pixel format, resolution, transforms and debayer settings. Various other controls specific to the connected camera will also show here.
- Controls: Thermal
This group of controls allows the user to setup the camera’s thermal controls. Here you will be able to change values such as the target temperature, fan speed, cooler power and dew heater settings as well as seeing the current sensor temperature.
- Controls: Exposure
This is the main group of controls for setting the camera’s exposure and gain values. The exposure slider is scaled by a drop-down list where the user can select the range of exposures that are most appropriate to the object being image. If supported by the camera, auto exposure and auto gain controls will show here. Auto exposure has been implemented for most camera types but it has little use for Astronomical use, it is best to enter exposure values manually. There is also a frame Integration (summing) option that will show for certain types of cameras.
- Controls: Histogram
This group shows the histogram and has several configuration options available via drop-down options. The histogram shows a graphical representation of the image data being received from the camera. More information about the histogram can be found further on in this article under the Histogram section.
- Controls: Preview Controls
The preview controls are non-destructive, meaning that they will not affect the saved image data. These controls are intended to improve the appearance of the image on the preview screen by changing the Gamma, Brightness or Contrast. In addition to this, there are transform controls to help dim objects become more visible. More information about these controls can be found further on in this article under the Display Controls section.
- Controls: Main
This group shows basic camera controls for altering settings such as Gamma, Brightness, Contrast and Sharpness.
- Controls: Colour
This group of controls allows colour values to be changed. This includes things such as Hue, Saturation and colour balance functions. Depending upon the connected camera, there may be controls for auto white balance. This control group will be empty if you are using a greyscale camera.
- Controls: MISC
This final group of controls provides information about how to contact the software developer and to check for new versions as well as information about donating to the AstroDMx Capture project.
Drop-down Menus and other Controls
AstroDMx has a standard drop-down menu configuration where most of the general functionality can be found. The menus are (from the left hand side) File, Options, Calibration Frames, Markers and Guides, Filter Wheel, Metadata, panning Options and Help. Below the main drop-down options is a quick access bar which has controls for connecting a camera, invoking the main capture window, taking snapshots and controlling the preview display’s scaling as well as flipping and flopping the image stream.
Connection Monitor
There are many things that can cause an astronomical camera to go offline and stop delivering frames. Some of these problems could be loose USB cables or the incorrect use of camera controls such as USB bandwidth or speed settings.
AstroDMx Capture has a Connection Monitor, this feature is enabled by default and regularly checks to see if the connected camera is still streaming. If the software detects that the camera has gone offline, then the camera is automatically reset and reinitialised with its existing settings and continues from the point of failure. If the software is currently capturing, then the capture is paused while the camera undergoes automatic reinitialisation and then continues from the point of failure without any user intervention.
This function works for all camera types (with the exception of DSLRs and Atik 16-bit cameras) and even works if a camera is accidentally disconnected during use. The connection monitor function can be disabled during the connection routine if required and the timeouts can be changed from the main options drop-down menu.
Real-time Frame Calibration
AstroDMx Capture implements real-time frame calibration. The user can capture and apply either a flat field, a dark frame or both and have the software apply the calibration in real-time. This functionality is of most use for outreach work which can produce a more pleasing preview display by removing artefacts such as hot pixels, dust bunnies or vignetting. The real-time calibration system can be applied to the preview screen and saved data or just the preview display which leaves the raw data uncalibrated.
Some cameras, such as uncooled entry level cameras, produce lots of hot pixels during long exposures which can make the object of interest less pleasing to view on the preview screen. This issue can also skew the histogram (because hot pixels are seen as signal). Using the real-time calibration system configured to calibrate only the preview screen means that the image data are left intact but the preview screen is cleaned up and the histogram will produce a more accurate curve due to the absence of hot pixel noise.
Keyboard and Mouse Controls
AstroDMx Capture has various keyboard shortcut to control the region of interest position and to control starting, pausing and stopping capture sessions. Many of the menus have a keyboard shortcut applied to them. To access these, you need to press the ALT key plus the keyboard shortcut.
ROI Nudge Control
If the camera has been setup for use with ROI, the user must left-click on the preview screen and then press the Shift key together with a cursor control key to nudge the ROI position. This can be useful if the object being imaged is drifting across the filed of view. Pressing a cursor control will move the ROI position therefore keeping the object centred.
ROI Mouse Selection
As of version 1.5.0.0, it is possible to use the mouse to draw a square or a rectangle around an object of interest in order to set the Region of Interest. To use this feature, simply press the left mouse button and then draw a square or a rectangle around the object that is required and then click YES on the message box.
Capture Controls
It is possible to start, stop or pause a capture session by pressing a single key. To use this functionality, open the capture dialog, once opened, you can press C to start capturing, press S to stop or P to pause.
Histogram
The histogram can be found on the right hand side of the application. It provides a graphical representation of the image data being received from the camera in real-time. It operates in various modes which are detailed below.
- Modes: Linear and Logarithmic;
- Channels: Red, Green, Blue, RGB Average, Luminance, RGB and Greyscale;
- Plots Modes: Dotted line, filled colour, RGB overlay, RGB merge.
Modes
The Linear mode displays the histogram as Linear data whereas the Logarithmic mode displays the histogram data logarithmically. A Logarithmic histogram is beneficial if the Linear mode is mostly at the left hand side.
Channels
If you are using a colour camera then the default mode is to show a true colour histogram. This mode is called RGB and will show the histogram as white if all colours are aligned otherwise a combination of the colours will be shown. For example, if Red and Green are aligned then the histogram will show yellow. Luminance is simply the calculated value of the luminance of each channel. RGB Average is merely the average of each channel and finally Red, Green and Blue modes show the separate channels respectively.
If using a greyscale camera, then the only mode that will show will be Grey. This is a representation of the only channel available.
Capture Settings
Main Capture Mode
The main capture functionality is accessed by clicking “Capture” from the top control bar in AstroDMx Capture. Clicking this button opens a new window which allows you to specify an output directory for the image data, to specify a name for the capture session and to chose an output format as well as modifying the way that output files are formatted. If a filter wheel is connected, you will be able to change the filter from this window.
Files are by default outputted with the object name, a sequence number and the current date. This can be changed by going to the Options drop-down menu and selecting Setup Output Format. An example of an outputted files looks similar to the following but, as previously mentioned, this format can be changed from the Options drop-down menu.
- object-name_000001_2022-03-22_data.tif
- object-name_000001_2022-03-22_log.txt
- object-name_000001_2022-03-22_histogram.png
AstroDMx is capable of outputting the following file formats when using the main capture functionality. All output formats are uncompressed and a fully compliant with the respective image formats which means that outputted files should be compatible with any image stacking or post-processing applications.
- AVI;
- Bitmap;
- TIFF 8 and 16-bit;
- FITS 8 and 16-bit;
- PNG 8 and 16-bit;
- SER 8 and 16-bit;
- DSLR – specific output formats such as Nikon nef and Canon cr2.
If you are saving TIFF, FITS or PNG then the resulting files are saved into a directory (folder) with the current time as the directory’s name. In turn, this directory is placed into the root of a directory named for the date of capture. This makes is easier to locate lots of files which might have been captured at different times or dates. If saving AVIs or SERs then the file is placed into a directory named after the date of capture session. The FITS implementation allows for the use of extensive custom metadata as well as automatically adding the usual camera control values.
The AVI processor in AstroDMx Capture has been written from the ground up and does not require any external dependencies. Furthermore, it only outputs uncompressed AVI files because compression is not desirable in any Astronomical data.
The software will output a log file which contains information about the specific capture session as well as a copy of the histogram.
As of version 1.4.5.0, the software has protection to stop the accidental overwrite of existing image data. Under very specific conditions, it was possible that image data could be overwritten but this would require the user to significantly change the file creation defaults.
Capture Modes
AstroDMx provides four capture modes. They are as follows.
- Frame Limit – Used to capture a specified number of frames;
- Time Limit – Capture as many frames as possible until the user specified time has elapsed;
- Time lapse – A single frame is captured after a specified time interval has elapsed;
- Manual – Continually capture frames until the stop button is pressed.
Snapshot Mode
AstroDMx has a convenient one-touch button to save a single image frame. The output formats can be TIFF, FITS or PNG and can be configured from the Snapshot Settings button at the top of the main UI. If the connected camera is colour, then the outputted data will be fully debayered using the High Quality Linear Interpolation debayer algorithm and saved as a RGB image.
Pixel Formats
Pixel Formats control how cameras deliver frames and how AstroDMx configures itself to work with a specific camera. The application supports various pixel formats and what is offered at connection time is determined by the camera’s specification.
Please note that the 16-bit formats detailed below will not necessarily use the full range of 16-bit integers. The actual maximum brightness level will be determined by your camera’s ADC. For example, if your ADC is 10-bit then the maximum brightness level will be 1024, if the ADC is 12-bit then the maximum value will be 4096, if the ADC is 14-bit then the maximum value will be 16,384 and for a 16-bit camera, the maximum brightness level will be 65,536. Of course, all 8-bit ADCs and pixel formats produce a maximum brightness level of 256.
Information about the ADC can be found in the status area at the bottom of AstroDMx Capture’s main UI.
If the camera does not have a 16-bit ADC, then AstroDMx is capable of aligning the values in the upper part of 16-bits or the lower part. This functionality can be found in the “Controls: Camera” section under the 16-bit Mapping drop-down list. “Map to Upper” produces an initially brighter image whereas “Map to Lower” will produce a dimmer image which will require more stretching during post-processing.
The main pixel formats for specialist Astronomy cameras are as follow.
RAW8 and RAW16
These pixel formats are offered for colour Astronomy cameras. The image data produced from these formats will be RAW, meaning the data will need to be debayered to produce full colour RGB images. Both these formats can be debayered in AstroDMx to produce RGB output or saved as RAW which will then have to be debayered during post-processing. For more information about Debayering, please see the Debayering section of this article.
RAW8 produces 8-bit image data whereas RAW16 produces 16-bit image data.
MONO8 and MONO16
These pixel formats are offered for greyscale specialist Astronomy cameras. The image data produced from these formats will have one channel and so will produce true greyscale image data. MONO8 produces 8-bit data and MONO16 produces 16-bit data.
RGB24 and RGB48
These pixel formats produce full colour RGB image data and do not need to be debayered. RGB24 produces 8-bit image data (8-bit per colour channel) and RGB48 produces 16-bit data (16-bit per colour channel). Most colour Astronomy cameras offer RGB24 but only certain cameras are capable of offering RGB48.
YUYV, UYV and Similar
These pixel formats are generally offered by webcams and other UVC devices with the notable exception of Imaging Source cameras such as the DMK and DFK. They are 8-bit colour formats and will produce full colour RGB image data. You should only use these formats if the formats above are not offered. There are many variants of these formats and most have been implemented in AstroDMx.
Y800 and Y16
These formats are similar to the ones detailed directly above but produce greyscale image data. Y800 is 8-bit and Y16 is 16-bit.
Debayering Options
AstroDMx Capture is able to debayer the camera’s output and display it on the screen using one of four algorithms. It is also capable of saving the fully debayerd output as standard RGB files using: Adaptive Homogeneity-Directed (AHD), high-quality linear interpolation, bilinear interpolation and Nearest Neighbour algorithms.
For performance reasons, the software allows the user to disable real-time debayering but have the display debayerd using a lower quality, less resource hungry debayering algorithm (Nearest Neighbour) while having the output saved as RAW, or choose not to have the display debayered. If no debayering is selected then the display will show a monochrome undebayered image with the bayer pattern visiable. The undebayered output will then need to be debayered during stacking.
The software works with four debayer patterns. RGGB, GBRG, GRGB and BGGR. It can automatically discover the correct bayer pattern or the user can specify it manually. Depending upon the camera, AstroDMx may be unable to discover the correct bayer pattern and so may show incorrect colours. In such a case, the user can manually select the correct pattern.
AstroDMx Capture supports the following debayering algorithms in order of quality.
- Adaptive Homogeneity-Directed (AHD;
- High Quality Linear Interpolation;
- Bilinear Interpolation;
- Nearest Neighbour.
The highest quality debayering algorithm is Adaptive Homogeneity-Directed (AHD), however, this algorithm is computationally heavy and so should only be used for long exposures. Using this algorithm for short exposures may significantly reduce the frame-rate. The best debayering algorithm for short exposures is High Quality Linear Interpolation.
Markers and Guides
It is possible for AstroDMx Capture to indicate to the user if part of an object has reached saturation. Saturated areas are show as one of three different predefined colours or can be set to any colour deemed appropriate by the user. Saturation indication is only visible on the real-time display and will not be present in the saved output. Some cameras don’t saturate at the usual expected value, in order to fix this, the software has a saturation sensitivity function. These options are available from the drop-down menus under Marks and Guides.
AstroDMx Capture has several reticles which can be used to help judge and centre objects. As with the saturation markers, the colour of the reticles can be changed to one of three defined colours or be set to a custom colour. AstroDMx has the following reticles.
- Concentric (Custom);
- Concentric;
- Crosshair;
- Thirds;
- Perimeter Markers;
- Edge and Centre Markers.
The Concentric (Custom) reticle is fully configurable and allows the user to reposition the centre of the reticle by using the mouse.
Filter Wheels
Currently, the software supports the ZWO range of filter wheels.
The software allows the user to give an arbitrary name to each filter and provides a quick and convenient method to change filters during capture. If the user enters the exposure ratios of their filters, the software will automatically adjust the exposure based on the value entered. The name given to the filter will be appended to the file name when saved.
Motion Detection
AstroDMx Capture has support for motion detection. This functionality has been added primarily for wildlife photography, for example nest box monitoring. The Motion Detection function can be invoked from the main drop-down options.
Display Preview Controls
The Display Preview Controls are a set of functions which allow the user to optimise how an image is shown on preview screen. The exact controls that will be available in this section are dependent upon the specification of the connected camera. In most cases, controls to adjust the gamma, brightness and contrast will be shown. If an 8-bit camera is being used then a software gain control will be available.
In addition to the above, if a camera supports bit depths greater than 8-bit then various transforms will be available. There is also a control that can reduce the resolution of the preview screen, this is useful for low powered computers and should be adjusted if significant lag is observed on the preview screen.
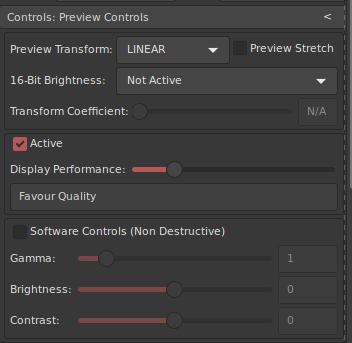
The controls in this group are non-destructive. This means that the settings applied here will not have an effect on the saved data. However, 8-bit formats allows the software gain, gamma, brightness and contrast to be applied to the saved data. This is useful for webcams which might not offer many controls.
The gamma, brightness and contrast controls should be self-explanatory. The other controls are detailed below.
Preview Transform and 16-bit Brightness
The “Preview Transform” control provides functionality to stretch the data coming from a 16-bit camera. 16-bit cameras are capable producing a larger range of brightness levels but some of the levels can be very low. The transforms are designed to increase the dimmer levels while leaving the brighter levels relatively unchanged. The controls are as follows.
- Clipping: This transform “clips” the maximum brightness level to 255;
- Linear: This function is a maps the 16-bit levels to 255 in a linear fashion;
- ArcSinH Stretch: This uses an ArcSinH Stretch function to increase the lower brightness levels on the preview screen;
- ArcSinH 1: This uses a trigonometry function to increase the lower brightness levels;
- ArcSinH 2: Same as the above but to a greater extent.
The “Transform Coefficient” is used with either of the ArcSinH transforms and will decreased the brightness of the space surrounding the object being imaged. The 16-bit brightness control increases the brightness of the preview display linearly.
Performance Controls
This control changes the resolution of the preview screen. Lower resolutions are processed faster but the quality is dropped. AstroDMx automatically sets this value based on the resolution of the camera. However, if the user is noticing significant lag on the preview screen this control can be used to improve performance. As with the other controls in this group, adjusting the performance control does not affect the saved data.
Supported Hardware
The following is a list of specialist Astronomical cameras that have been directly implemented in AstroDMx Capture and have been tested. The cameras listed here should work “out of the box” and do not need an INDI server. There are some issues associated with the ASI120MC, for more detailed please see the help page.
Specialist Astronomical Cameras
- INDI Mounts
- INDI Filter Wheels
- INDI Focusers
- INDI Cameras
- OGMACamera (All models)
- OMEGON veTEC533c;
- MTR3CMOS09000KPA.
- Altair Hypercam 294C Pro TEC (Full implementation)
- Altair 183C
- Altair 183C
- Altair GP-CAM
- Other Altair models should work but are untested
- Atik 314L
- Atik 314L+
- Atik 314E
- Other Atik cameras should work
- Nikon D50 DSLR (No tethered bulb)
- Nikon D5100 DSLR (No tethered bulb)
- Canon 4000D
- Canon 600D
- Canon 40D
- Canon 500D
- Canon 7D Mk2
- Other DSLR cameras should work but are untested
- QHY 5-II-M
- QHY 5L-II-M
- QHY 5-II-C
- QHY 5L-II-C
- QHY5III178M
- QHY5III178C
- Other QHY cameras should work
- DMK 21AU04.AS (8 bit ADC)
- DFK 21AU04.AS (8 bit ADC)
- DBK 21AU04.AS (8 bit ADC)
- DMK41AU02.AS (8 bit ADC)
- DMK 37AUX273
- Other DMK, DFK and DBK cameras should work
- ZWO ASI120MC (USB2.0, 12 bit ADC)
- ZWO ASI120MC-S (USB3.0, 12 bit ADC)
- ZWO ASI120MM-S (USB3.0, 12 bit ADC)
- ZWO ASI178MC (USB3 14 bit ADC)
- Other ZWO cameras should work
- Bresser MicrOcular Full HD Digital Camera (8 bit ADC)
- SVBony SV105
- SVBony SV205 (may require firmware upgrade, see the technical help page)
- SVBony SV305
- SVBony SV305PRO
- SVBony SV305M PRO
- SVBony SV405CC
- Lumenera USB2 and USB3 Cameras. Due to SDK limitations, only USB3 Lumenera cameras are supported on Linux. There is no support for Lumenara cameras on macOS.
UVC Compliant Devices
The following is a list of UVC compliant cameras which have been specifically tested in AstroDMx Capture. All other UVC compliant webcams and capture cards should work.
- Sweex WC066 HD webcam series (8 bit ADC)
- Philips SPC900NC including SPC800 and Philips 740 flashed to SPC900NC (8 bit ADC)
- Philips 740 ToUCam Pro (mono feed only) map YUYV to greyscale for true mono. (8 bit ADC)
- Philips 690 Vesta Pro Webcam (8 bit ADC)
- Logitech HD C525 (8 bit ADC)
- Microsoft LIFECAM 2 (8 bit ADC)
- Creative Webcam Live (8 bit ADC) Bayer output only.
- Creative Webcam Live (8 bit ADC) JFIF/JPEG output only
- Teslong Endoscope Camera
- Orion Starshoot Solar System Color Imager IV
- All UVC compliant cameras should work
Mounts, Focusers, Filter wheels and Non-native Cameras
- ZWO Range of motorised filter wheels
- INDI Mounts
- INDI Cameras
- INDI Filter Wheels
- INDI Focusers